
AZURE DEPLOYMENT
Deploy NetConnect in your Microsoft Azure environment following our easy instructions below
ORDER ᛫ INSTALL ᛫ CONFIGURE ᛫ GO
Phase 1 Order and Installation
Create the NetConnect virtual machine
To begin:
Click on “Create”
Configure basic virtual machine settings
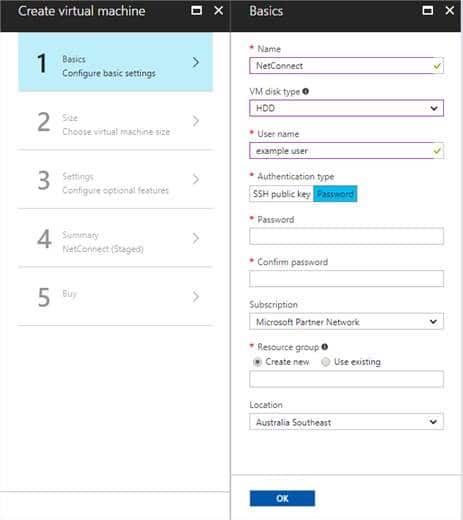
Fill in information as required:
Name: Enter a name as required, for example ‘NetConnect’
VM disk type: HDD
Username: Enter a username as required. Please note, the username will only be required in a very limited number of scenarios and will not be used in day to day activities.
Authentication type: Password
Subscription: Select as required.
Resource Group: Select as required.
Location: Select as required.
Click “OK” to continue
Choose Virtual Machine size
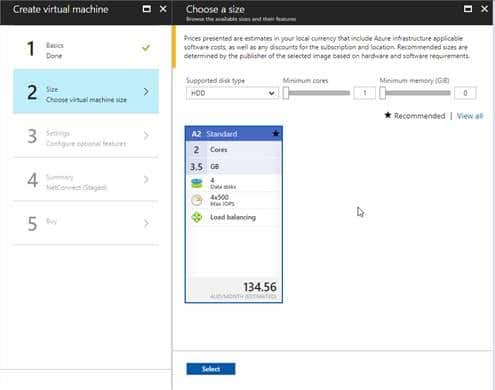
We recommend using the A2 Standard Configuration for evaluation purposes. The A2 Standard will sustain up to 50 concurrent users under normal activity, however this can be increased to meet requirements.
Click “Select” to continue
Configure optional features
Use this table as a guide:
| Disk Type | HDD |
|---|---|
| Use Managed disks | No |
| Network Settings | Configure as required. Ensure you select the same network as the server(s) which you wish to provide access to. |
| Extensions | No Extensions |
| High Availability | None |
| Monitoring | Select as required |
| Diag Storage Account | Select as required |
Click “OK” to continue
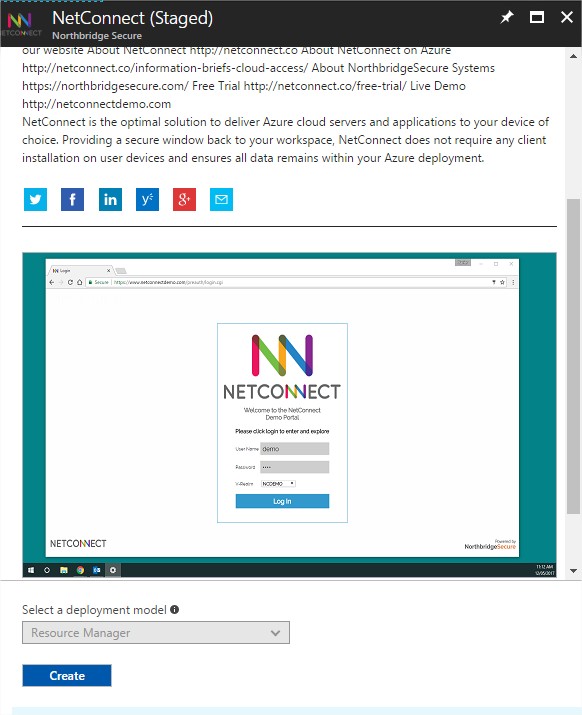
Summary
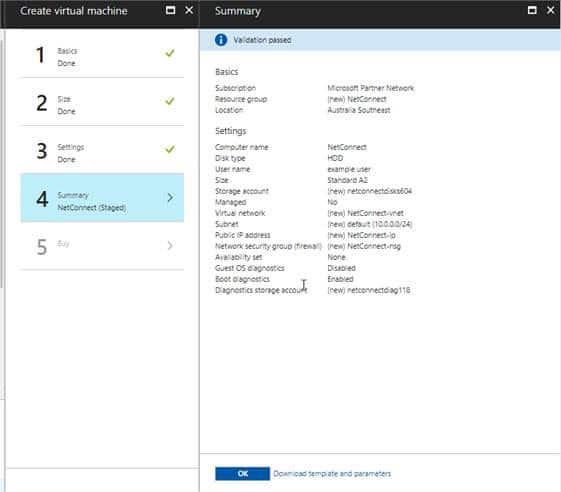
Confirm all values are correct and click “OK”
Confirm Purchase
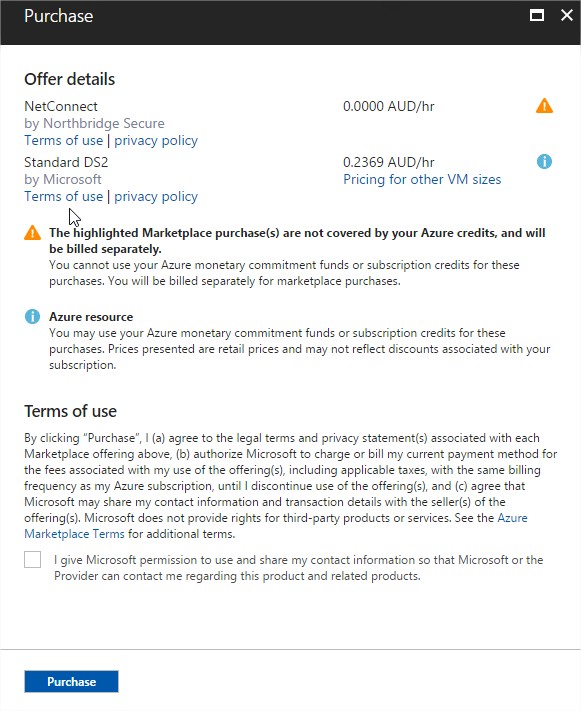
Note: this only confirms the purchase of the Virtual Machine and does not include the NetConnect licences. NetConnect licences can be purchased from Northbridge Secure partners all over the world.
More information on pricing is available via your preferred distributor or IT partner.
Tick the box “I give Microsoft….”, and click “Purchase”.
You server will be provisioned in under a minute.
Congratulations, you have installed your server! Now all you need to do is configure your first connection.
Phase 2 Basic Configuration
Connect to your server via a web browser
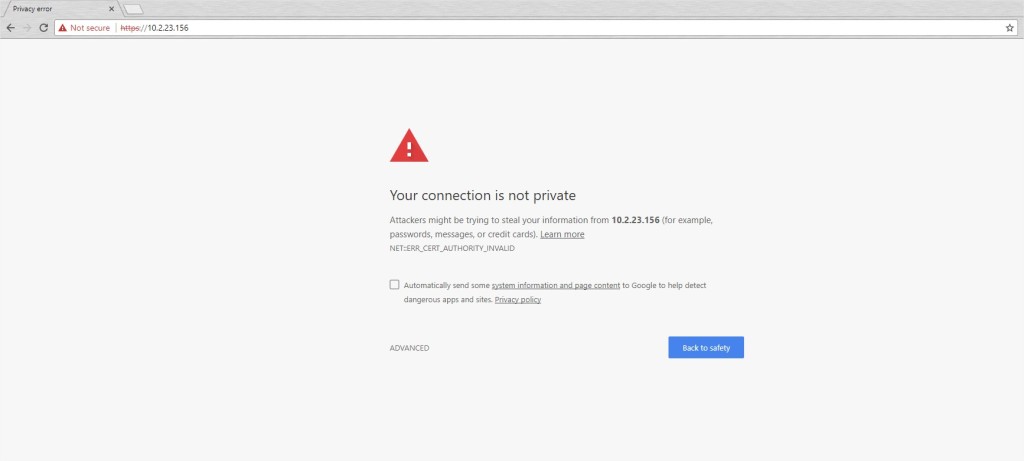
Your NetConnect server is now available from any browser by connecting to the public IP Address provided by Microsoft.
At this stage your NetConnect server will not have an SSL certificate installed, so you will see a security warning (the exact format of this warning will vary based on your browser) – please proceed past the warning to connect the server to reach the NetConnect logon page.
You can connect using the default admin username and passwords:
Username: admin
Password: adminv8
V-Realm: Local
It is strongly recommended that all default passwords are changed and recorded securely upon your first connection.
Navigate to the admin portal
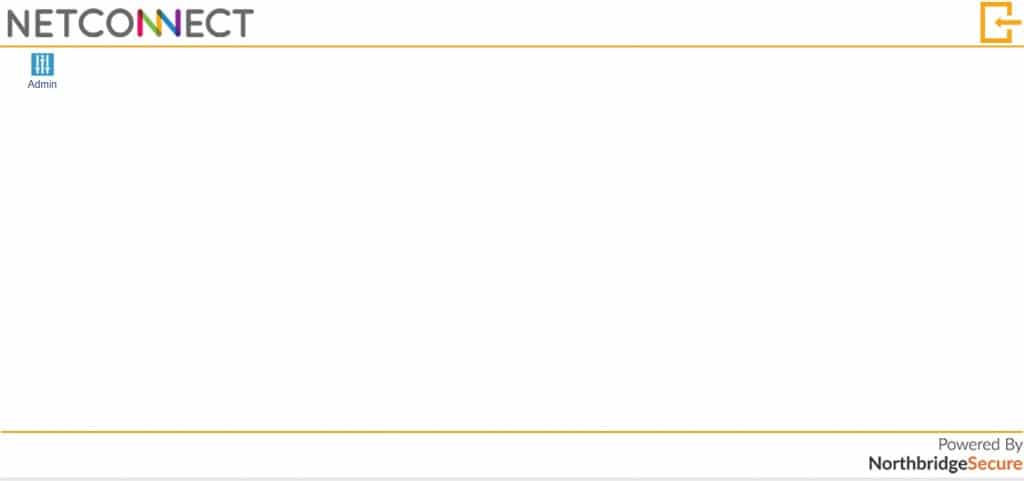
Once logged in, NetConnect will present you with the admin account WebTop. This is the space where users will access their assigned applications once NetConnect configuration is complete.
Click on “Admin” application to get access to the administration portal.
Change the Administrator password
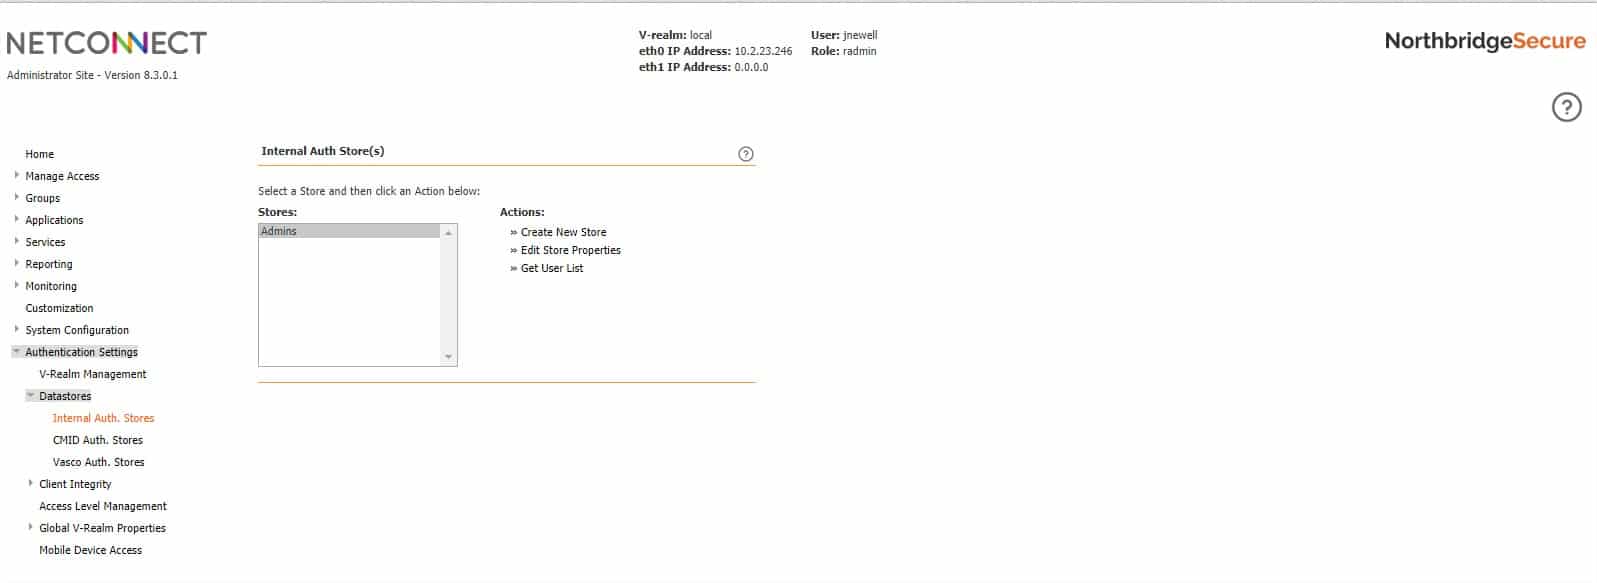
From the Administrator Site, navigate to Authentication Settings > Datastores > Internal Auth Stores
- Select Admins and then click Get User List as shown.
- Select the admin account for which you want to change the password and then click Edit Properties.
- Enter a new password in the New Password field and then type the identical password in the New Password Confirm field.
- Once you have changed the password, log out and then log in again using the new password.
Ensure you record the new password in a secure location. If the password is lost, there is no facility to recover.
Configure the first remote desktop connection
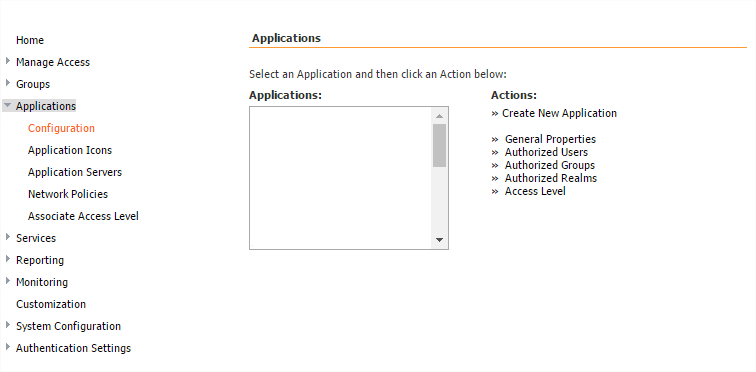
- Navigate to Applications > Configuration on the Admin portal.
- Select Create New Application.
From the Create New Application page:
- Enter ‘Desktop’ as the application name in the Application Namefield.
- Select Remote Application from the Application Protocol drop-down menu
- Click Submit.
From the General Properties page:
- Enter the hostname or IP address of the server you wish to publish in the Full Address field.
- Ensure HTML5 Client is turned to On
- Leave all other settings as default and click Modify to complete creating the application.
The new ‘Desktop’ application has now been created and is available to be assigned to users.
Assign Applications
Navigate to Applications > Configuration within the Admin portal.
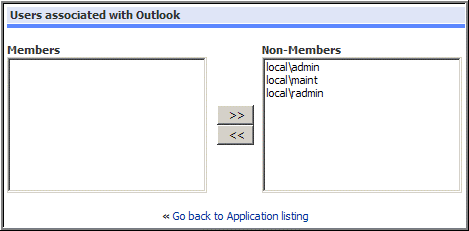
- Select the application created in the previous step and click on Authorized Users.
From the Users Associated with Desktop page:
- Highlight Local\Admin within the Non-Member column, then click on the arrow pointing towards the ‘Members’ column. Note, changes to the Members and Non Members columns are saved automatically.
Finally, close the Admin tab log out of NetConnect from the WebTop. The next time you log in you will see the new Desktop application on the WebTop. Click on this and you’ll launch your very first NetConnect session.
Congratulations, you have just finished your first installation of NetConnect!
Request a trial license
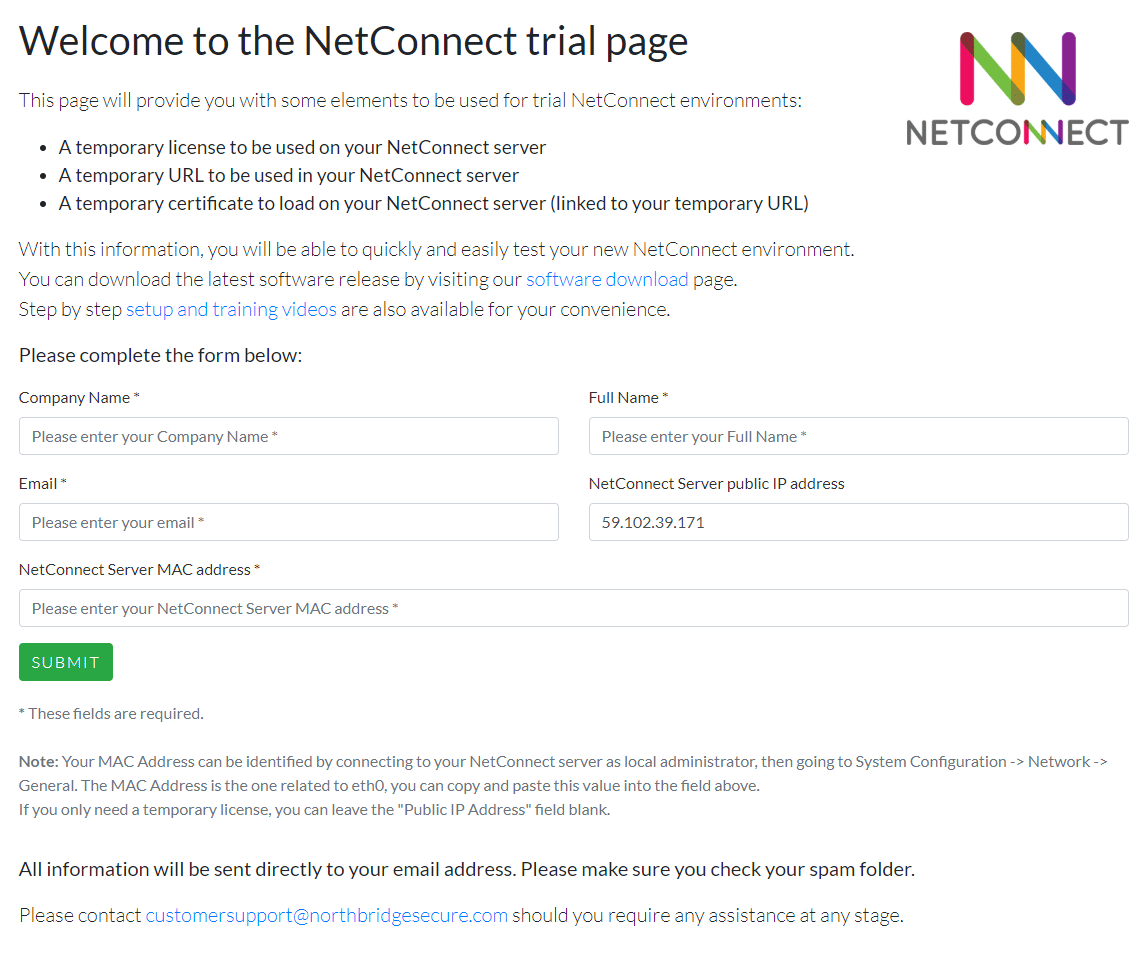
In order to access NetConnect for testing with non-admin accounts, you will require a trial license. Simply navigate to https://www.trialwww.northbridgesecure.comm and fill out the relevant information to obtain a trial license. Don’t forget to check our Configuration Guide for more detail in the options available, we’ll also cover some Azure-specific options below.
*Your MAC address can be located by navigate to System Configuration > Network > General within the Admin portal. Copy the MAC address listed under ETH0 Interface.
Install an SSL Certificate

NetConnect can be configured for external access tvia a sub-domain of your choice (for example, netconnect.yourdomain.com). It is strongly recommended that an SSL Certificate is applied to your NetConnect instance in order to ensure connections to your network are securely encrypted. Detailed instruction on requesting and applying a certificate can be found with the NetConnect Configuration Guide, however as an overview you will need to:
- Generate a CSR from within the NetConnect Admin Portal.
- Submit the CSR to the certificate provider of your choice.
- Once your certificate provider has issued your certificate, simply apply it to the NetConnect system along with any required Root or Intermediate certificates.
Note, you will need to make the appropriate updates to your DNS to ensure your chosen sub-domain resolves to your Public IP address.
Phase 3 Detailed Configuration - Azure AD
Azure Active Directory integration
The following sections describe how to integrate NetConnect with Azure Active Directory. NetConnect can integrate with Azure Active Directory to simplify authentication and access for specific users/accounts. In order to integrate, Azure Active Directory Domain Services must be enabled on your Microsoft Azure environment https://azure.microsoft.com/en-au/services/active-directory-ds/.
If you do not wish to integrate NetConnect with Azure AD you can skip past this section. Please note, if you plan to integrate with Azure MFA, you do not need to follow the steps listed in this section.
V-Realms and authentication stage overview
NetConnect authentication is built around the concept of V-Realms, which allow for advanced authentication management. V-Realms simplify the provisioning of authentication and entitlements, which can include employees, partners and affiliated authorised users (such as physicians affiliated with a hospital). A user’s association with a V-Realm determines the user’s method of authentication, and also determines the authentication server(s) against which a user’s credentials are validated.
Authentication stages are defined within a V-Realm and are used to indicate the type of authentication server that validates a user’s login credentials. Each defined authentication stage has two components, an authentication section and a policy section. The authentication section is required for any given stage. However, the policy definition is optional. Configuring policy enables retrieval of group membership information about users from external authentication servers when they log in.
Pre–Requisites
1. Sound understanding of, and experience with the Microsoft Azure platform.
2. An understanding of the following areas in the context of Microsoft Azure:
- Virtualized environments.
- Virtual machines.
- Networking fundamentals.
3. Admin access to a deployed instance of NetConnect on Microsoft Azure.
4. At least one application configured within NetConnect.
5. An Azure environment with Azure Active Directory Domain Service enabled.
6. A sound understanding of Microsoft Azure Active Directory Domain Services.
7. The IP address of your Azure AD.
- This can be found within the Active Directory section of your Azure Portal; the IP address is located within the ‘Configure’ page of your directory. See http://docs.microsoft.com/en-au/azure/active-directory-domain-services/active-directory-ds-getting-started-enableaadds for details.
Authorising access to applications
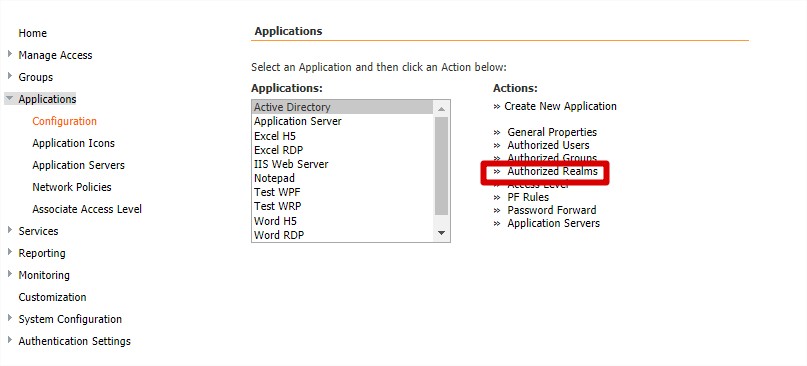
Once your V-Realm has been created and configured, applications can be assigned. Authorised applications appear on users’ WebTop when they log in. Application access can be granted to individual users, a group of users or by V-Realm.
- Navigate to Applications > Configuration. The Applications page opens.
- Select the name of the application that you wish to assign users to.
- Click one of the following options from the Actions menu.
- Authorised Users: Assign application access to individual users. Note, the user must have logged into NetConnect prior to appearing.
- Authorised Groups: Assign application access to groups of users. Note, a user from this group must have logged into NetConnect prior to a group appearing.
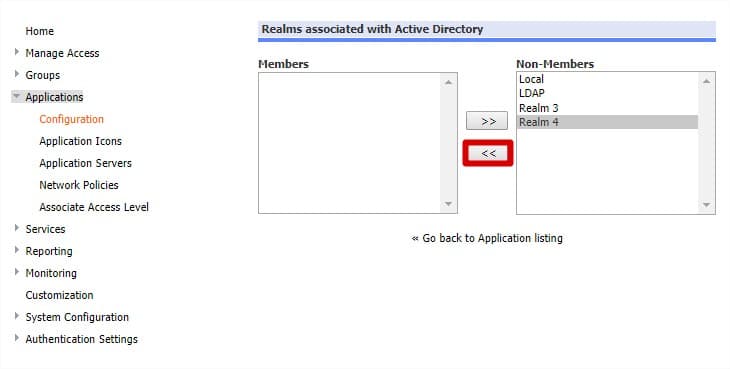
- Authorised V-Realms: Assign application access to users of a particular V-Realm.
- Choose the user/group/V-Realm you want to grant access to this application from the Non-Members column, and then click the arrow to move them to the Members column.
Changes are saved automatically. Next time a user logs in to NetConnect, the assigned application will be available on their webtop.
Retrieving your unique Azure AD Bind DN string
- When creating an LDAP authentication stage, you will need to enter a Bind DN as part of the configuration steps. The Bind DN contains informatio unique to your Azure AD which is used to create the authentication link between Active Directory and NetConnect. It is recommended a single, specific user is created within your Azure AD for this purpose. In order to locate the Bind DN from Azure Active Directory a specific server feature must first be added to a server joined to your domain.
-
- From your Azure Portal, create a new user within your Active Directory. We recommend you use a name that clearly specifies this users purpose, for example NetConnectBind. Please note NetConnect will need to be updated if this users password is changed or expires, you may wish to consider removing any password expiration policies from this specific account.
- Add the ‘NetConnectBind’ user to the AAD DC Administrators group. This group would have been created when you initial configured Azure Active Directory Domain Services, see https://azure.microsoft.com/en-au/services/active-directory-ds/ for more information.
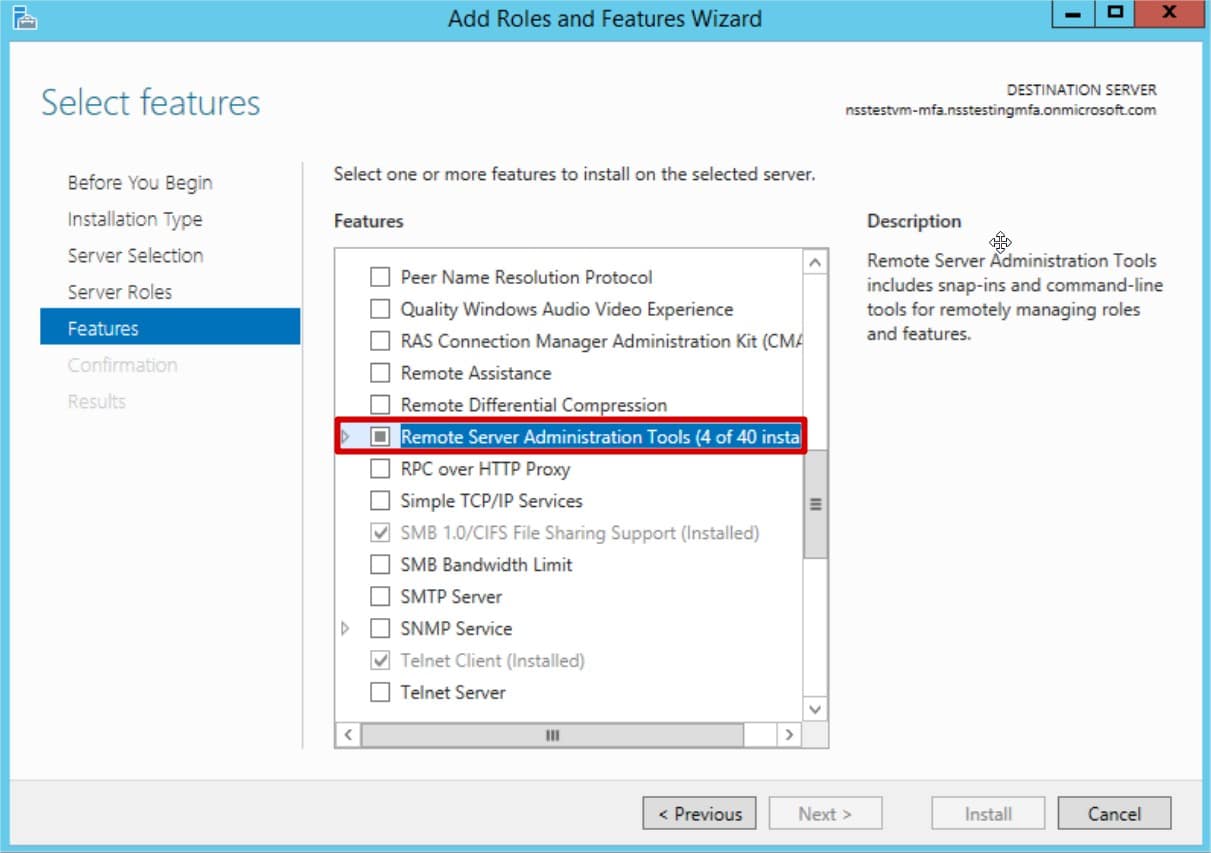
- From a server joined to your Azure domain, navigate to the Add Roles and Features Wizard within your chosen server Server Manager console.
- Locate the Remote Server Administration Tools feature and install using the default settings. Once the remote server administration tool feature is installed, you will have access to the Active Directory Administrative Centre.
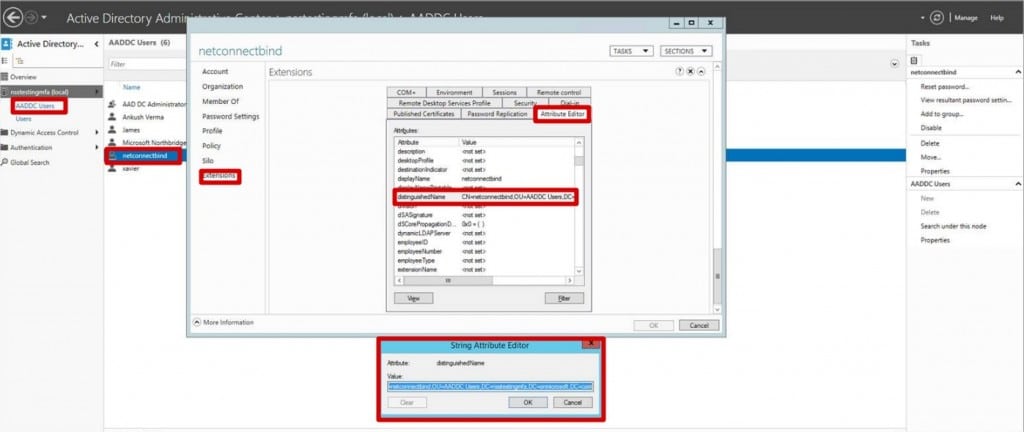
- Navigate to the Active Directory Administrative Centre and select on AADDC Users.
- Right click on the NetConnectBind user and select Properties. Click
Extensions from the right hand side and then select the Attribute Editor - Scroll Down to the distingushedName attribute and double click to open. The value represents the Bind DN for your Azure AD and will be required when configuring the NetConnect authentication stage.Locate the Remote Server Administration Tools feature and install using the default settings. Once the remote server administration tool feature is installed, you will have access to the Active Directory Administrative Centre.
-
Creating a V-Realm and LDAP authentication stage
This section describes the steps required to create a V-Realm and an LDAP Authentication Stage.
- Log in to NetConnect with the administrator account.
- From the Administrator Site, click Authentication Settings.
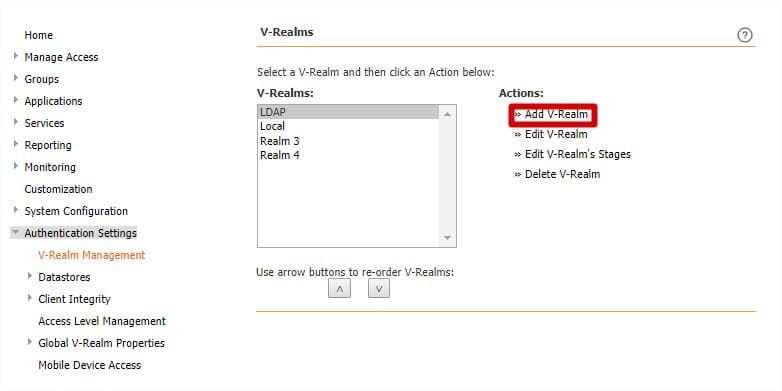
- Click V-Realm Management. The Authentication Settings page opens.
- Note once you have created your V-Realm, you use the arrows buttons to change the order that V-Realms appear on the log on page.
- Click Add Realm as shown
- Enter a name to identify the authentication V-Realm and click Submit.
- Select LDAP from the Stage Type drop down list box located under Create New Authentication Stage.
- Click Submit.
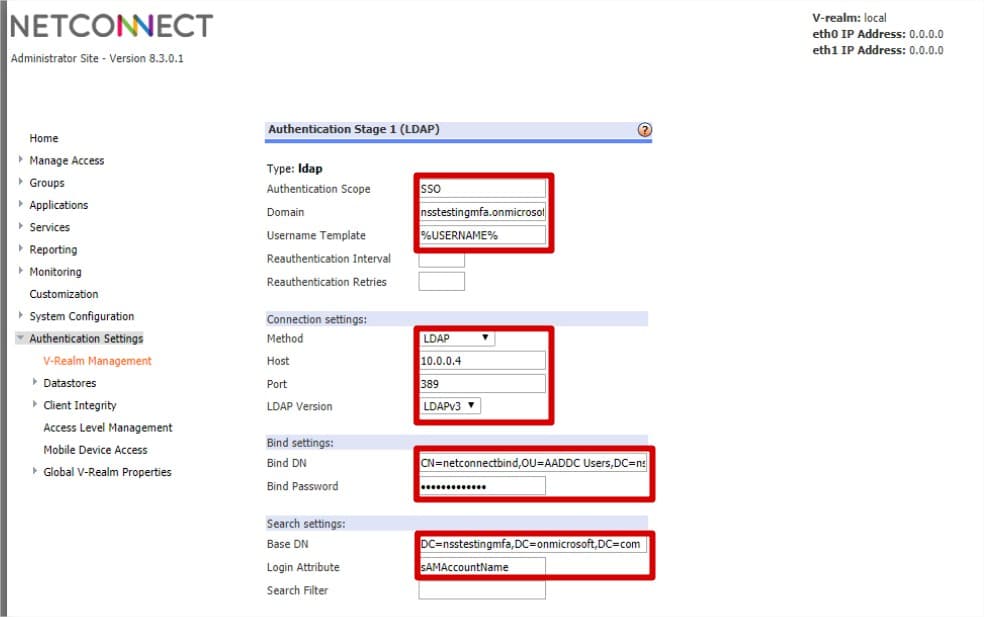
You will be presented with the Authentication Stage properties page. The basic settings that are required for configuring NetConnect to authenticate users against an external LDAP server can be seen below.
- Authentication Scope: This field is used to enable Single Sign-On (SSO)/Password Forwarding.
Enter a unique name of your choice for the Authentication Scope; for example SSO-01. This name will be referenced when configuring SSO for an Application. - Domain: Enter the domain which the Azure Active Directory is joined to.
- Username Template: Leave as Default (%USERNAME%)
- Method: Select LDAP
- Host: Enter the IP address of your Azure AD. Your IP address can be found within the Active Directory section of your Azure Portal, the IP address is located within the ‘Configure’ page of your directory. See https://docs.microsoft.com/en-au/azure/active-directory-domain-services/active-directory-ds-getting-started-enableaadds for details.
- Port: Enter 3389.
- LDAP Version: Select LDAPv3
- Bind DN: Enter the distinguished name (DN) of a client authorised to search within the LDAP server, as located earlier in this document. For example CN=NetConnectBind,OU=AADDC Users,DC=nsstestingmfa,DC=onmicrosoft,DC=com
- Bind Password: Enter the password of the account created for Bind DN. Please note, this field will need to be updated if the Bind account is changed or expires.
- Base DN: Specify the point in the directory hierarchy where a search begins. Enter the base DN (or base Object) from which you want to search. For example DC=nsstestingmfa,DC=onmicrosoft,DC=com
- Login Attribute: Enter sAMAccountName.
- Click Submit.
Once completed, users from your Azure Active Directory will be able to log into your NetConnect instance.
Phase 4 Detailed Configuration - Azure MFA
Azure Multi Factor Authentication
NetConnect can be configured to integrate with Azure Multi-Factor Authentication service in order to provide an additional layer of security to your infrastructure. Utilising the Azure Multi-Factor Authentication Server as a RADIUS server, users must respond to an automated phone call or text message from Microsoft in order to access NetConnect. The following steps assume you have an existing Azure MFA instance, configured with directory integration on a domain joined Active Directory or Azure Active Directory.
If you do not wish to integrate with Azure MFA, you can skip past this section.
V-Realms and authentication stage overview
NetConnect can be configured to allow user authentication in a number of ways. Authentication is built around the concept of V-Realms, which allow for advanced authentication management. V-Realms simplify the provisioning of authentication and entitlements, which can include employees, partners and affiliated authorised users (such as physicians affiliated with a hospital). A user’s association with a V-Realm determines the user’s method of authentication, and also determines the authentication server(s) against which a user’s credentials are validated.
Authentication stages are defined within a V-Realm and are used to indicate the type of authentication server that validates a user’s login credentials. Each defined authentication stage has two components, an authentication section and a policy section. The authentication section is required for any given stage. However, the policy definition is optional. Configuring policy enables retrieval of group membership information about users from external authentication servers when they log in.
Pre–Requisites
1. Sound understanding of, and experience with the Microsoft Azure platform.
2. An understanding of the following areas in the context of Microsoft Azure:
- Virtualized environments.
- Virtual machines.
- Networking fundamentals.
3. Admin access to a deployed instance of NetConnect on Microsoft Azure.
4. At least one application configured within NetConnect.
5. An Azure environment configured with Azure MFA, with directory integration on a domain joined Active Directory or Azure Active Directory.
6. A sound understanding of Azure MFA.
Adding NetConnect to the Multi-Factor Authentication server.
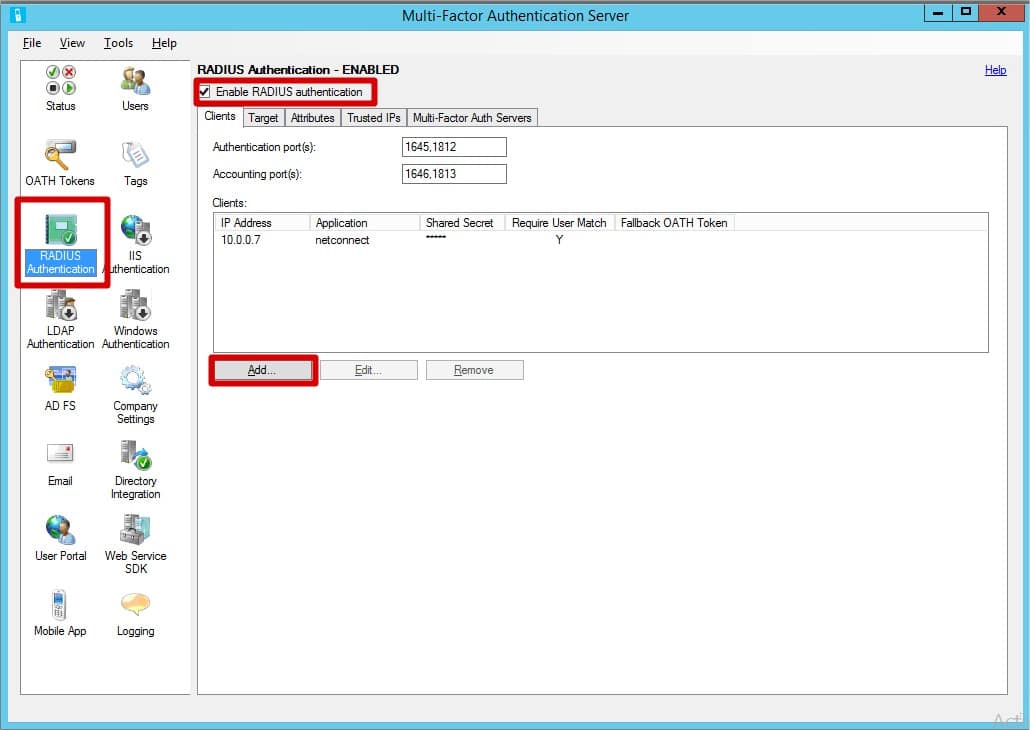
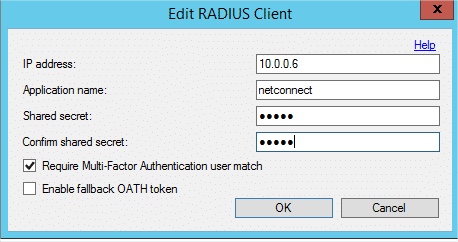
- Navigate to the Radius Authentication section within the MFA server. Ensure Enable RADIUS authentication is ticked. Within the Clients tab, click Add.
- Enter the following details
- IP Address: Internal IP address of the NetConnect VM
- Application Name: NetConnect
- Shared Secret: Enter a shared secret of your choice.
- Confirm Share Secret: Re-enter Shared Secret.
- Multi-Factor Authentication user match: Ensure this box is ticked.
- Click “OK“.
3. Within the Target tab, ensure ‘Windows Domain’ is selected.
Locating your RADIUS server IP address
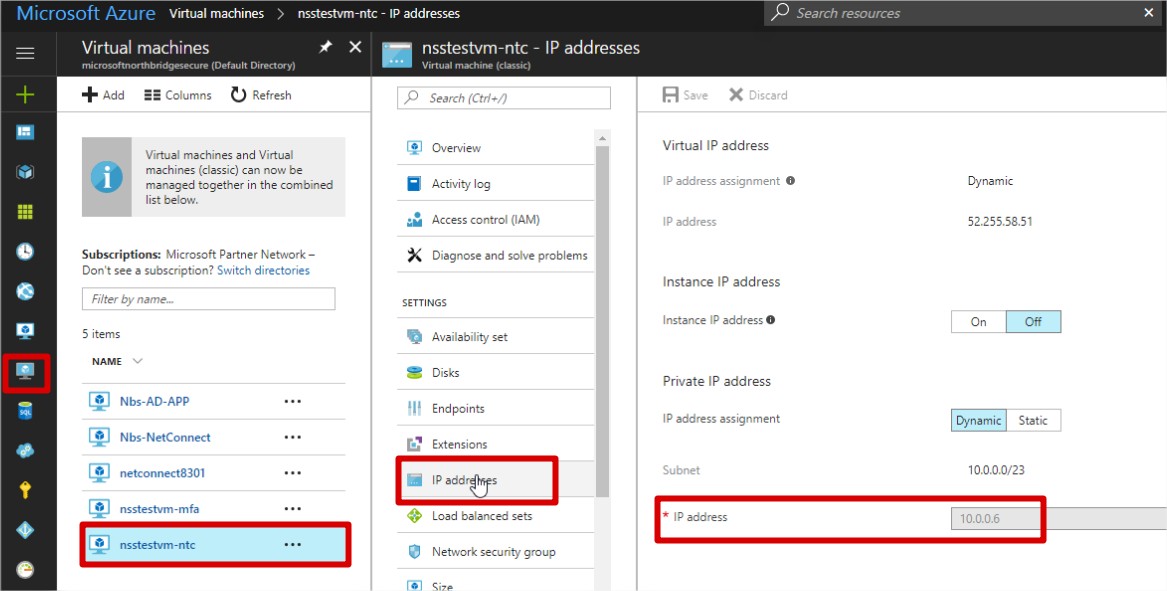
As part of the configuration steps, you will be required to enter the IP address of your Azure MFA server. This can be located within your Azure Portal by navigating to the IP address section of the virtual machine where your Azure Multi-Factor Authentication Server is installed.
Creating a V-Realm and RADIUS Authentication stage
This section describes the steps required to create a V-Realm and an RADIUS Authentication Stage.
- Log in to NetConnect with the local admin account.
- From the Administrator Site, click Authentication Settings.
- Click V-Realm Management. The Authentication Settings page opens.
- Note once you have created your V-Realm, you use the arrows buttons to change the order that V-Realms appear on the log on page.
- Click Add V-Realm as shown
- Enter a name to identify the authentication V-Realm and click Submit.
- Choose RADIUS from the Stage Type drop down list box located under Create New Authentication Stage.
- Click Submit
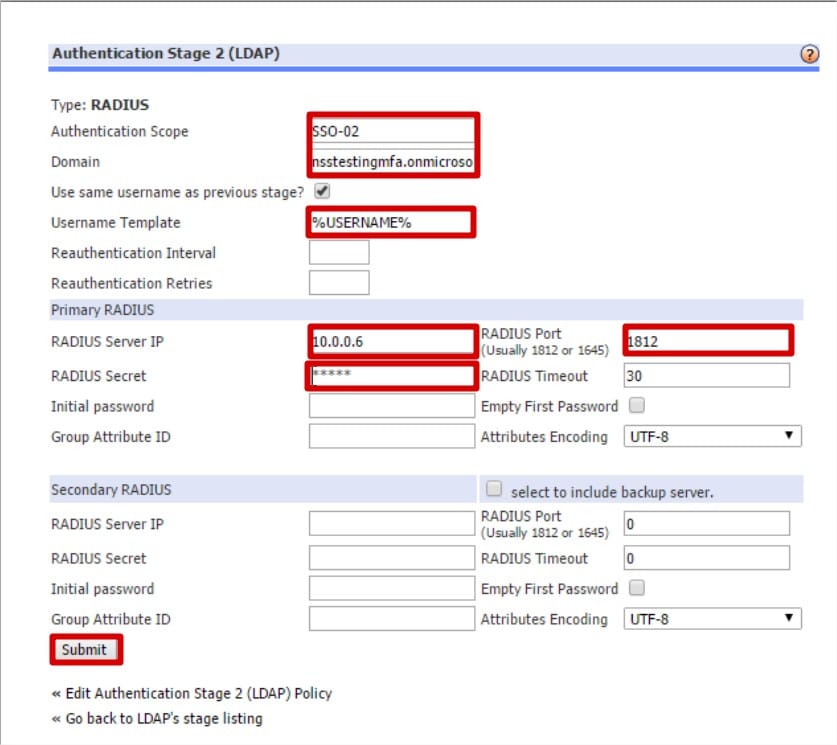
The Authentication Stage properties page opens.
- Authentication Scope: This field is used to enable Single Sign-On (SSO)/Password Forwarding.
Enter a unique name of your choice for the Authentication Scope; for example SSO-01. This name will be referenced when configuring SSO for an Application. - Domain: Enter the domain which the Azure MFA server is joined to.
- Username Template: Leave as Default (%USERNAME%)
- Primary RADIUS Server IP: IP address of the server with Azure MFA installed.
- Primary RADIUS Secret: Enter the Shared Secret configured for NetConnect within the MFA server. The RADIUS Secret is case-sensitive and must match the RADIUS server secret exactly.
- Primary RADIUS Port: 1812.
- Click Submit
Once you have completed the above steps you will be able to access NetConnect using an account from the configured domain, with a second authentication stage via Azure MFA. When testing, ensure you select the appropriate V-Realm from at the log in page. Once you have entered your username and password, you will be prompted to either enter a text message, or answer a phone call depending on the configuration of your Azure MFA instance.
Setting up Single Sign On (SSO) via password forwarding
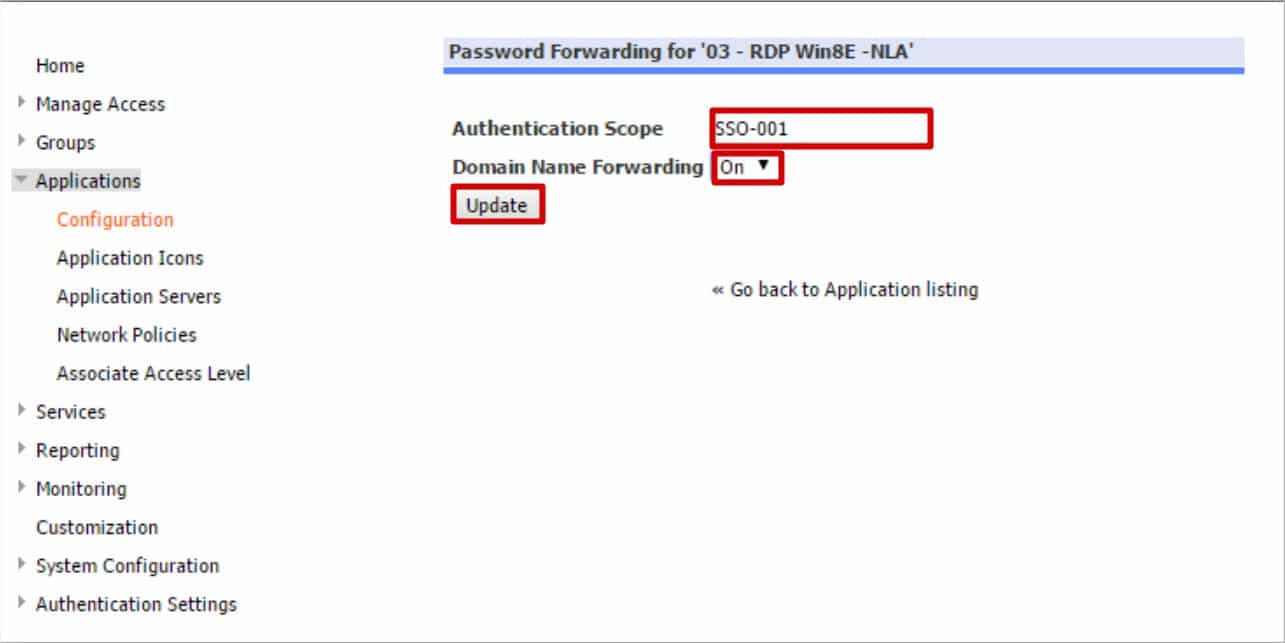
If your application servers require users to enter credentials for access, you can simplify the log in process by setting up password forwarding. With password forwarding, once users log in, they can access back end application servers without having to enter credentials. In order for Single Sign On to be enabled, the Authentication Scope and Domain fields must be completed within the specific V-Realms Authentication Stage. Password Forwarding can be configured for RDP and VNC applications.
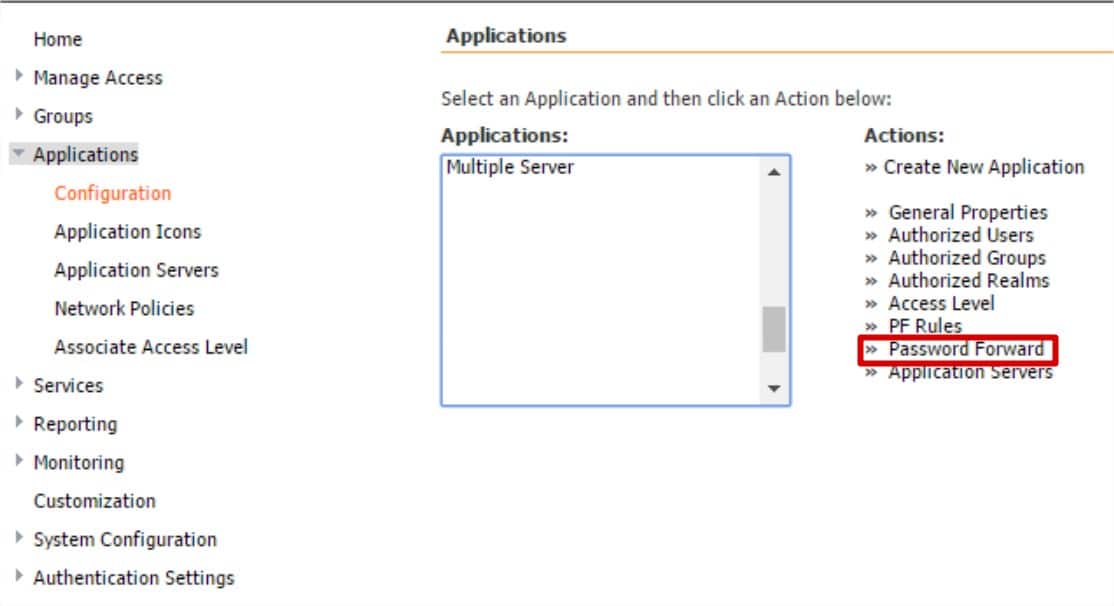
- Navigate to Applications > Configuration
- Select the name of the application that you wish to enable SSO and click Password Forward.
- Authentication Scope: Enter the Authentication Scope you created during the LDAP Authentication configuration. Enter the same name that was entered in the authentication configuration in this field. This entry must match exactly.
- Domain Name Forwarding: Set to ‘On’
- Click Update to complete the process.
Once all the relevant details have been entered, users will be able to log into your NetConnect instance using their Azure AD credentials and access their assigned application(s).